
Multiple rating fields
Introduction
Подсказка
This article applies to easyComm 1.6.0-pl and above, and only to MODX 2.*.
Подсказка
This mechanism is NOT implemented in the MODX 3 version of the component. You cannot add fields this way in MODX 3.
easyComm has a single rating field that lets visitors rate something with stars. A typical use is product or service reviews.
Sometimes you need several such fields.
For example, consider an automotive site where visitors leave car reviews. Each review can have an overall rating, an appearance rating, and a reliability rating.
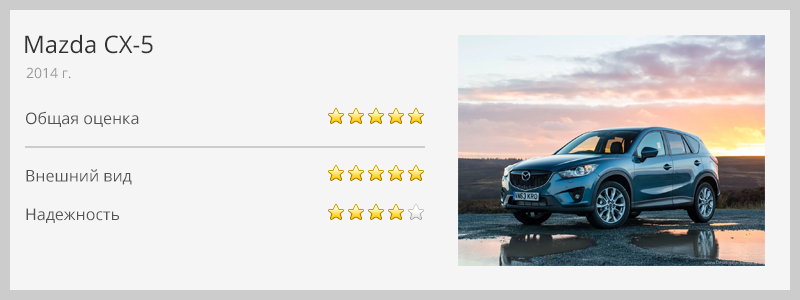
Here is how to use easyComm with these three fields.
We have three fields; for simplicity we will name them:
- overall rating – rating;
- appearance – rating2;
- reliability – rating3.
The rating field already exists; we only add rating2 and rating3.
You will need to:
- add the fields to the database;
- add them to the objects so MODX knows about them;
- configure their display in the manager;
- add lexicon entries;
- configure the review form and rating display in the message list.
This overlaps with the "Plugins and customization" doc and is a special case.
Step 1. Add fields to the database
Easiest via phpMyAdmin.
1.1. Add fields to two tables:
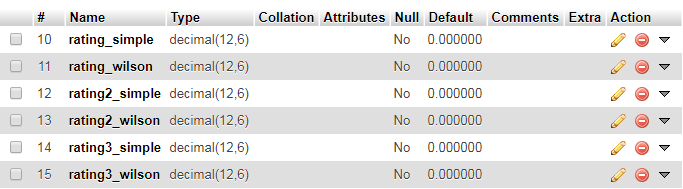
- modx_ec_messages. Add two fields rating2 and rating3, same as rating (Type – tinyint(1), Null – false, Default – 0).

- modx_ec_threads. Add twice as many fields (simple and Wilson for each rating): rating2_simple, rating2_wilson, rating3_simple, rating3_wilson (Type – decimal, Length 12,6, Null – false, Default – 0).
Step 2. Create plugin files to extend objects
2.1. Create folder "multirating" (any name) in two directories:
/core/components/easycomm/plugins/multirating//assets/components/easycomm/plugins/multirating/
2.2. In /core/components/easycomm/plugins/multirating/ create the PHP files:
php
<?php

return array(
  'xpdo_meta_map' => array(
    'ecMessage' => require_once dirname(__FILE__) .'/ecmessage.map.inc.php',
    'ecThread' => require_once dirname(__FILE__) .'/ecthread.map.inc.php'
  ),
  'manager' => array(
    'ecMessage' => MODX_ASSETS_URL . 'components/easycomm/plugins/multirating/ecmessage.js',
    'ecThread' => MODX_ASSETS_URL . 'components/easycomm/plugins/multirating/ecthread.js'
  )
);
php
<?php

return array(
  'fields' => array(
    'rating2' => NULL,
    'rating3' => NULL
  ),
  'fieldMeta' => array(
    'rating2' => array(
      'dbtype' => 'tinyint',
      'precision' => '1',
      'phptype' => 'integer',
      'null' => false,
      'default' => 0
    ),
    'rating3' => array(
      'dbtype' => 'tinyint',
      'precision' => '1',
      'phptype' => 'integer',
      'null' => false,
      'default' => 0
    ),
  ),
  'indexes' => array(

  )
);
php
<?php

return array(
  'fields' => array(
    'rating2_simple' => 0,
    'rating2_wilson' => 0,
    'rating3_simple' => 0,
    'rating3_wilson' => 0,
  ),
  'fieldMeta' => array(
    'rating2_simple' => array(
      'dbtype' => 'decimal',
      'precision' => '12,6',
      'phptype' => 'float',
      'null' => false,
      'default' => 0,
    ),
    'rating2_wilson' => array(
      'dbtype' => 'decimal',
      'precision' => '12,6',
      'phptype' => 'float',
      'null' => false,
      'default' => 0,
    ),
    'rating3_simple' => array(
      'dbtype' => 'decimal',
      'precision' => '12,6',
      'phptype' => 'float',
      'null' => false,
      'default' => 0,
    ),
    'rating3_wilson' => array(
      'dbtype' => 'decimal',
      'precision' => '12,6',
      'phptype' => 'float',
      'null' => false,
      'default' => 0,
    ),
  ),
  'indexes' => array(

  )
);
The first file describes the plugin; the second extends ecMessage; the third extends ecThread.
2.3. In /assets/components/easycomm/plugins/multirating/ create the JS files:
js
easyComm.plugin.multirating = {
  getFields: function (config) {
    return {
      rating2: { xtype: 'numberfield', allowBlank: false, allowNegative: false, allowDecimals: false, fieldLabel: _('ec_message_rating2'), anchor: '99%' },
      rating3: { xtype: 'numberfield', allowBlank: false, allowNegative: false, allowDecimals: false, fieldLabel: _('ec_message_rating3'), anchor: '99%' }
    }
  }
  ,getColumns: function () {
    return {
      rating2: { width:90, sortable:true, name: 'rating2', renderer: easyComm.utils.renderRating },
      rating3: { width:90, sortable:true, name: 'rating3', renderer: easyComm.utils.renderRating }
    }
  }
};
js
easyComm.pluginThread.myplugin = {
  getFields: function (config) {
    return {
      rating2_simple: { xtype: 'displayfield', fieldLabel: _('ec_message_rating2'), anchor: '99%' },
      rating2_wilson: { xtype: 'displayfield', fieldLabel: _('ec_message_rating2'), anchor: '99%' },
      rating3_simple: { xtype: 'displayfield', fieldLabel: _('ec_message_rating3'), anchor: '99%' },
      rating3_wilson: { xtype: 'displayfield', fieldLabel: _('ec_message_rating3'), anchor: '99%' }
    }
  }
  ,getColumns: function () {
    return {
      rating2_simple: { width:90, sortable:true, name: 'rating2', renderer: easyComm.utils.renderRating },
      rating2_wilson: { width:90, sortable:true, name: 'rating2', renderer: easyComm.utils.renderRating },
      rating3_simple: { width:90, sortable:true, name: 'rating3', renderer: easyComm.utils.renderRating },
      rating3_wilson: { width:90, sortable:true, name: 'rating3', renderer: easyComm.utils.renderRating }
    }
  }
};
Now MODX knows about the new fields but we do not see them yet. Add their display in the manager.
Step 3. Display fields in the manager
easyComm has system settings that control which fields appear in the message/thread list and edit window: ec_message_grid_fields, ec_message_window_layout, ec_thread_grid_fields, ec_thread_window_fields.
Add your new fields to these. See "Plugins and customization" for details.
Step 4. Add lexicon entries
If everything is correct, open Applications → Messages (easyComm) in the manager; the new columns should appear in the message list. Table headers may be empty.
Go to Lexicon Management, choose namespace easycomm and your language, and add:
ec_message_rating2ec_message_rating3ec_thread_rating2_simpleec_thread_rating2_wilsonec_thread_rating3_simpleec_thread_rating3_wilson
Later add frontend entries with prefix "ec_fe_...".
Step 5. Frontend: review form
Snippet ecForm handles the form. Set parameters explicitly: requiredFields (e.g. user_name,rating,rating2,rating3) and allowedFields (e.g. user_name,user_email,rating,rating2,rating3,text).
Important
These parameters must list all form fields you need. Check the snippet docs for defaults.
Also update the form chunk (parameter tplForm). Either copy the default chunk and set tplForm to it, or edit the default chunk and be careful not to overwrite it on update. To add star inputs for rating2 and rating3, copy the HTML for the rating field and replace "rating" with "rating2" and "rating3" respectively, except for CSS class names and the data-description attribute. The built-in JS uses class names, so it will work with the new fields.
Step 6. Frontend: message list and overall rating
Snippets ecMessages and ecThreadRating handle output. Copy chunks tpl.ecMessages.Row and tpl.ecThreadRating (or edit them) and add your new rating fields like the existing rating.
Step 7. Final setup
Tell the component that the new fields are rating fields. Use system setting ec_rating_fields: comma-separated list, e.g. "rating,rating2,rating3". This setting is not created on install; create it under System Settings, namespace "easycomm", "Create new parameter".
Осторожно
Without this setting, the rating logic will not work.
For fields listed here the component will compute averages and validate that values are between 0 and ec_rating_max.